How did I spend my Sunday afternoon? Well .. (aside from being in front of my laptop) - listening to songs on Gaana.com/Mirchi Internet Radio Channel - but through my home theater. Now why would I listed to Radio on the internet through the home theater when the home theater itself has an option of listening to public radio directly. The reasons are many:
If you've read this far, I sincerely would urge you also try this experiment at your home - trust me, my entertainment universe is now far wider because I can choose between watching live TV, listening to live radio or watching You Tube, listening to internet radio - seamlessly with the flick of a button. I hope you too can enjoy the same luxury!
.
- Public radio does not always suit my mood on weekends - on internet radio I have a choice to listen to songs which I am in mood for: Meethi Mirchi if I am in for latest hits, Puraani Jeans if I am in mood for old classics, Mirchi Edge if I am in mood for offbeat and Club Mirchi for dance numbers (think Saturday Night) [Ref: http://gaana.com/#!/radiostations]
- Internet Radio offers far superior quality - as good as listening to MP3 on my iPod
- Listening to radio is far better / hassle free than playing songs from your own playlist. You don't have to choose each song you want to listen but just choose either an pre-existing playlist or a channel of choice
But this blog post is not about my preferences for Sunday afternoon entertainment - its about how I was listening to 'Internet Radio' on my home theater. So, here are the brass tacks - how to connect 'Internet Radio' to your 'Home Theater' - few (and very expensive) home theaters come with USB connectivity for large (>2 GB) USB drives leave alone internet connectivity. But all of us have laptops with internet on them - just connect the two and enjoy! Isn't that simple?
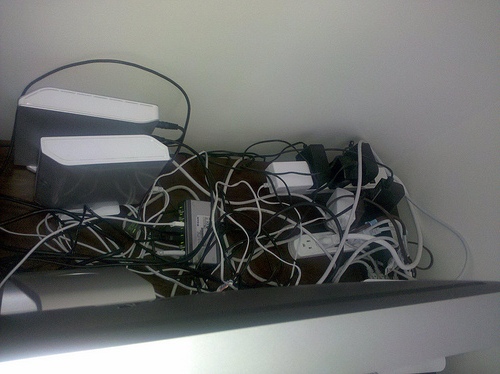
Simple - Yes. Elegant - No. If you already have a home theater connected to your TV using the same power plug to connect both, the backside of these appliances looks like this:
You might have concealed this cob-web of wires behind a shelf, but if you want to connect your laptop to your TV & Home theater - you will end up revealing at least 1 wire - either the HDMI or the VGA cable outside like this.
So the solution is to get a wireless Laptop to TV connector - I bought this one from Netgear. If you are in Mumbai, Hallmark Systems in Andheri is a reliable supplier of this product - this is the complete supplier list. Also, there are some other similar products now available from Netgear in the US. Not sure about worldwide distribution. If you are in US - Warpia might also be a good option. The approximate price in Indian Rupees is between 6000 to 8000 - but expect them to come down fast!
Once you get your shipment, connect it to the TV through HDMI and connect the other dongle through USB to your laptop. Make sure there is no obstruction in the 'line of sight' between the dongle connected to the laptop and the base unit connected to the TV. [Don't forget to connect power supply to the base unit ;-) ]
You will have to install the driver software that comes along with the hardware - and lo! you are done.
The last thing you must do is put your TV on mute and instead route the sound to your home theater so that you can listen to the internet radio through your High Fidelity speakers (and surround sound etc.) of your home theater.
Watching Movies / Video
You might face problems in watching videos directly by playing them on the laptop and streaming them to the TV simultaneously - the video might be jerky. The trouble is not the wireless speeds as you would suspect, but its your video graphics card driver. The solution is simple - rather than duplicate your screen, just extend it as shown below - press Fn + F7 on Lenovo / Fn + F8 on Dell / Fn + F5 on HP (For others click here) or its equivalent key; when the screen like below comes - select 'Extend'.
For Windows XP, you might have to right click on your desktop, go to properties or Display Properties through your control panel and select 'Extend Monitor'.
The only hassle now is that you will have to move the video play program (VLC, Windows Media Player etc.) to the extended screen i.e. now your TV screen and then play the video. But on the brighter side, now you can work on your laptop while it plays the video on the TV screen.
If you've read this far, I sincerely would urge you also try this experiment at your home - trust me, my entertainment universe is now far wider because I can choose between watching live TV, listening to live radio or watching You Tube, listening to internet radio - seamlessly with the flick of a button. I hope you too can enjoy the same luxury!
.


Good post ... I liked the experiment !!
ReplyDelete